Friday, February 26, 2010

Friday Egg


It is a beautiful day today.  The sun is shining and the sky is blue and I am inside my dark little studio working on eggs!  But here is a lovely little iris egg in honor of spring.  I started with a white egg, as you can see from the outlines.  I like the mix of traditional patterns on the bottom and and the free-form flowers on top.

Here's the entire thing, finished with one coat of varnish (I will do a couple more in the next few days).  I will start including a scale object (penny) so you can easily see the size of the egg:


Here are a few more detail shots of the egg:


Flower Easter Egg


Happy Friday, everyone!

Friday, February 19, 2010

Friday Egg

Pysanky Roses on Blue
I really enjoyed making the Friday Egg today!  I used blue as the background color which I haven't done in a long time and it made for a completely different feeling. Sometimes I feel that the blue isn't deep or dark enough to set off the bright colors, but combined with the golden yellow, reds and green, it makes for a circus-y feeling egg.

Following the theme of using traditional designs in non-traditional ways, the eight-pointed stars/roses float around the egg, accented with small flowers and leaves.  I enjoyed the opportunity to experiment with different patterns within the roses themselves.  Normally, I try to match any sets because I like the balance of a traditional egg, but since this didn't have to be balanced (at least in the traditional sense) I could have a bit of fun.  I started with the Pysanky Showcase Golden Brown, then went back down to white and back up again. I will be trying this one again with different patterns and color schemes.

Ukrainian Egg in Circus colors

Pysanka Egg with Roses


Pysanky Ukrainian Egg

Blue Egg with Yellow Stars

Pysanky Egg with Geometric Stars and Flowers


Ukrainian Egg Non-Traditional

Thanks for looking!  Have a great weekend.

Monday, February 15, 2010

This is my future...

At least I hope this is my future! I now officially need an iphone solely so I can have this app for processing credit cards: Square

There's no merchant fee or contract just 2.9% of sales.  And the processor itself is a beauty: looks like about an inch square that plugs into the audio jack of your iphone.  Never more would I be embarrassed about dragging out my gigantic machine with (shudder) the carbon copy triplicate receipts that look so 1982.

Want.

Friday, February 12, 2010

Friday Egg

A valentine egg for you today! Pretty scarlet poppy on a white background on a goose egg, approximately 4 1/2 inches tall.

Red Poppy Pysanky on Goose EggRed Poppy Pysanky on Goose Egg

Red Poppy Pysanky on Goose EggRed Poppy Pysanky on Goose Egg

Monday, February 8, 2010

Gilding Revisited

Ostrich Pysanky with Gilding


I revisited the gilding idea today. I just know there is a way to do it that will enhance the qualities of the design without looking tacky or "applied."  Instead of a brush, I used a calligraphy pen nib and that gave me a lot more control over the adhesive sizing.  Now I am able to follow a line instead of just doing dots, which I think is getting more to the look that I am interested in.

The following two photos are of an egg with the sizing applied after the first coat of varnish.  The sizing was a bit "slippery" on the slick surface, so the edges are sloppy:

Pysanky egg with gilding

Pysanky egg with gilding

This photo shows the sizing applied on the bare egg, after dyeing but before varnish.  The sizing kind of sunk in and stayed where I put it. I like these edges a lot better.

Pysanky egg with gilding

This last is an ostrich egg that was already varnished and finished, but I thought some gold accents would be a lot of fun.  There's already so much going on with the design that I thought I might as well do some gold, too!


Pysanky egg with gilding

Pysanky egg with gilding

As you can see, there was some traveling of the adhesive sizing on this egg as well.

I did manage to fix my problem from last week of the gold sheet getting wrinkled before I even got it on the egg.  Since I last bought gold leaf Mona Lisa Art Products has come out with a new product called Simple Leaf that has the gold leaf attached to a piece of vellum which you place on the adhesive.  In theory, only the part of the gold leaf touching the adhesive comes off the vellum. In practice, it kind of tears off more that that, but a quick rub and scrub with a large paintbrush gets rid of the excess and the result is much more shiny and smooth than the regular gold leaf.

Friday, February 5, 2010

My varnishing set-up

Pysanky Varnishing Process

I completed a couple of eggs for my usual Friday Egg schedule, but I ended up having to varnish them instead of taking "boudoir photos" of the eggs.  I can only put varnish on when the weather is clear and dry and it has been raining here for what seems like weeks! So here we are in my dark and dreary garage workroom, where I will show you how I put varnish on eggs.

I have really struggled with this step in the process. The problem is getting a smooth coat of varnish on a round surface.  I tried using the drying board with nails that various Pysanky egg suppliers sell, but that never worked because the egg would stick to the nail tips and either a bit of varnish or a bit of the eggshell itself would break off! Not good. Spray varnish is another way to go, and it is okay, but I am not patient and end up with drips and dribbles because I spray far too heavy of a coat instead of lots of thin ones.  Plus I found that it is much more expensive as well as wasteful.

Now I use varnish out of a can (Liquitex or Golden MSA) and apply it with a fan brush, which allows a bit thinner coating.  To keep the eggshell supported without touching it, I use lengths of floral wire inside the original hole from blowing out the egg contents. I insert the wire into blocks of floral styrofoam or a block of styrofoam mailing popcorn.

Here I am using my drying board to support the egg while I varnish it.

Pysanky Varnish Process

 I start with the egg vertical and brush varnish on the top and sides.  Then I flip it over and get the bottom part of the egg.  Finally, I brush from bottom to top on all sides until I feel that I have gotten good and even coverage.

Pysanky Varnish Process


As much as I can, I try to keep the coats light because I don't monitor for drips and hate getting a dried up bump at the bottom that I have to sand off or cut off with an X-acto blade.  One good thing about using the floral wire is that extra varnish will often drip down and off the egg completely.

Here's the egg stuck into styrofoam and ready to dry out:

Pysanky Varnish Process


Oh, and one last thing:  DON'T USE WATER-BASED VARNISH!!!  I learned the hard way when the guy at the hardware store steered me wrong.  Just make sure it is the one with health hazard warnings all over the can and you will be safe.  You might not be healthy, but you will be safe in knowing you are using the right varnish.

If you have any tips or ideas that you think might make this process easier, I would love to hear them.

Wednesday, February 3, 2010

Gilded Egg


We arrived back home from Santa Fe yesterday, and I have some great ideas for new egg designs that surprisingly have not much to do with either Southwestern or Native American traditions.

We always try to get a visit in to Ten Thousand Waves after a day of skiing.  I would like to go every day, but it gets a bit expensive.  This time we enjoyed 85 minutes in the "Waterfall" tub, which is a marvelously large tub with a bench and jets on one side and a deep end that goes to at least 4 feet at the other end.  There is a cold plunge with a waterfall to jump in when the hot tub gets to be too much, and a dry sauna for variety. I felt like a boiled noodle at the end - it was great fun!

The spa is inspired by Japanese baths, so everything is spare and considered and simple.  The gift shop is full of candles and tea sets and gorgeous little ceramic bibelot.  Among all that, I found a well-thumbed copy of a book called "Traditional Kimono Silks" by Anita Yasuda.  The book is basically a  photo album of kimono fabric scraps, so visually inspiring, though edited sloppily with mislabeled pictures throughout - very disappointing.  However, it has furthered my thinking about trying to keep the rhythm of a design or pattern while managing to free it from a rigid grid or framework.   More of this in the weeks to come...

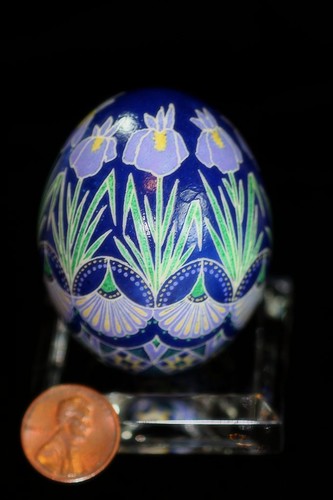
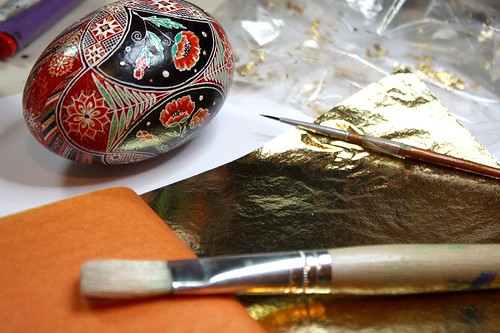
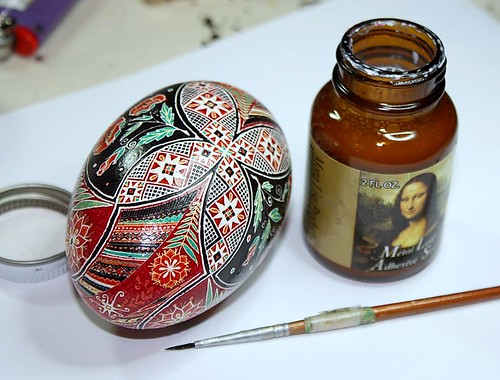
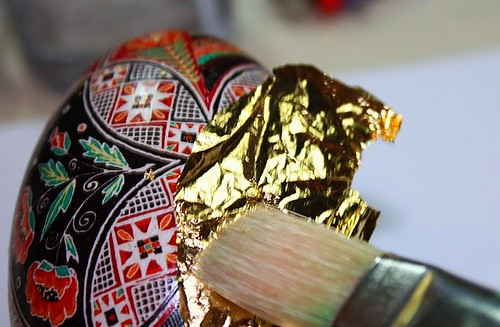
In addition, I started thinking about using a bit of gilding to pick out some highlights in the eggs. Today I dug out my glue and gold leaf to see what I could do to enhance a finished design.  The picture above shows the finished product.  I used Mona Lisa Products sizing and leaf, that I got ages ago at Hobby Lobby.


To start, I put tiny dots of the glue/sizing where I wanted the gold to be:


The difficult part of this is waiting for the glue to get tacky, which takes about an hour, without accidentally smearing it. 

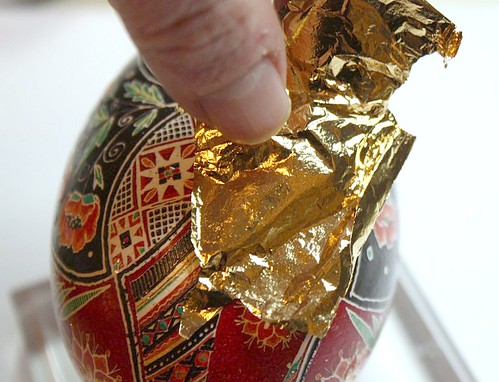
Once the glue is tacky rather than wet it's time to put the gold leaf on.  It gets kind of messy, and I need to figure out a better way to keep the sheets smooth so that they go on smoothly.  It looks "okay" when it is wrinkled, but much better and more professional when smooth.

I used a large paintbrush...


to smooth the gold leaf over the adhesive...


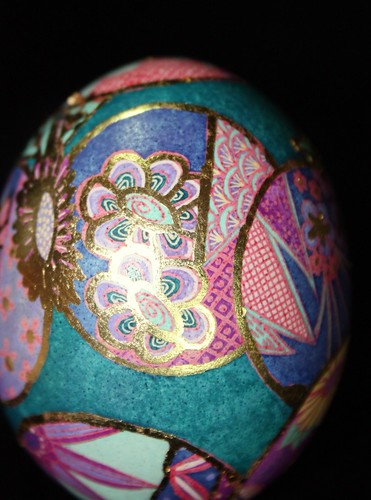
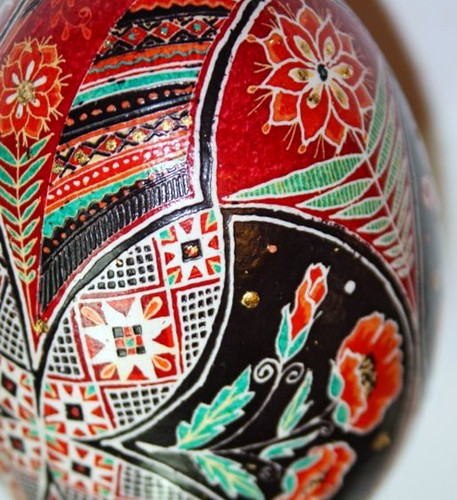
What do you think?  I am of two minds about this.  I love gold and glitter as much as the next person (probably more), but it does have a tendency to make something look cheaper somehow.  Plus, I want to avoid looking like I am trying to make Faberge style eggs.


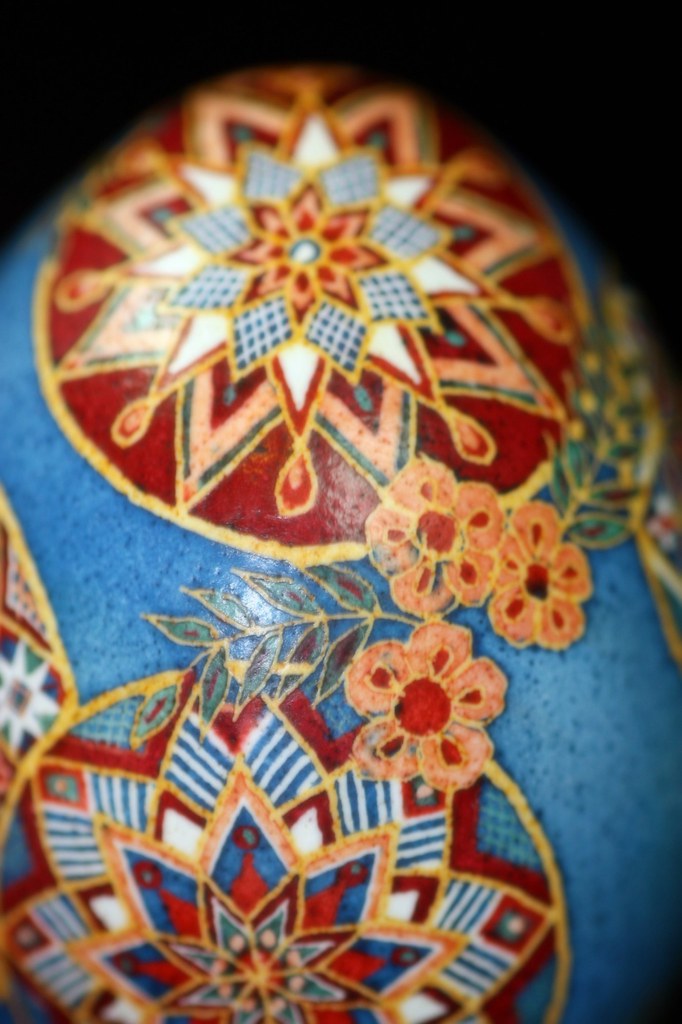
Here's another one that I glitzed up: